在CDN技术中比较常见的软件有ATS,varnish和squid三款,以前博客写了一篇关于varnish的博文,参考:如何建立Varnish CDN集群 ,使用Varnish从内存加速你的WordPress网站,今天用ansible的playbook功能批量部署ATS缓存(四台小鸡)
参考:https://qing.su/article/traffic-server-reverse-proxy.html
ATS下载地址:http://trafficserver.apache.org/

1、Apache Traffic Server简介
Apache Traffic Server由Yahoo于2009年开源,经过现在已经成为了非常成熟的代理/缓存/CDN系统。早在2009年,雅虎使用Traffic Server就可以用150台服务器实现每天400 TB的高速流量分发。经过多年的发展,ATS已经用于非常多的商业CDN分发与大型网络。Traffic Server与Nginx, Varnish三者几乎称霸了世界上所有CDN运营商,而Traffic Server又是这三者之中使用量最大的。与Nginx相比,Traffic Server拥有同样优异的性能显著的更多的功能,更丰富的接口,以及高度自定义的配置。与Varnish相比,Traffic Server对于高并发高负载的处理更为出色。
使用Traffic Server的CDN/大型网络有Apple, Comcast, Yahoo, Akamai, 以及国内的又拍云等等。
2、Ansible的playbook是什么东西?用句通俗的话解释就是 用yaml语法编写的ansible脚本,对比于shell脚本,关于ansible的简介和安装请参考上一篇博文
Centos7/8使用ansible批量部署zabbix监控集群[13只小鸡]
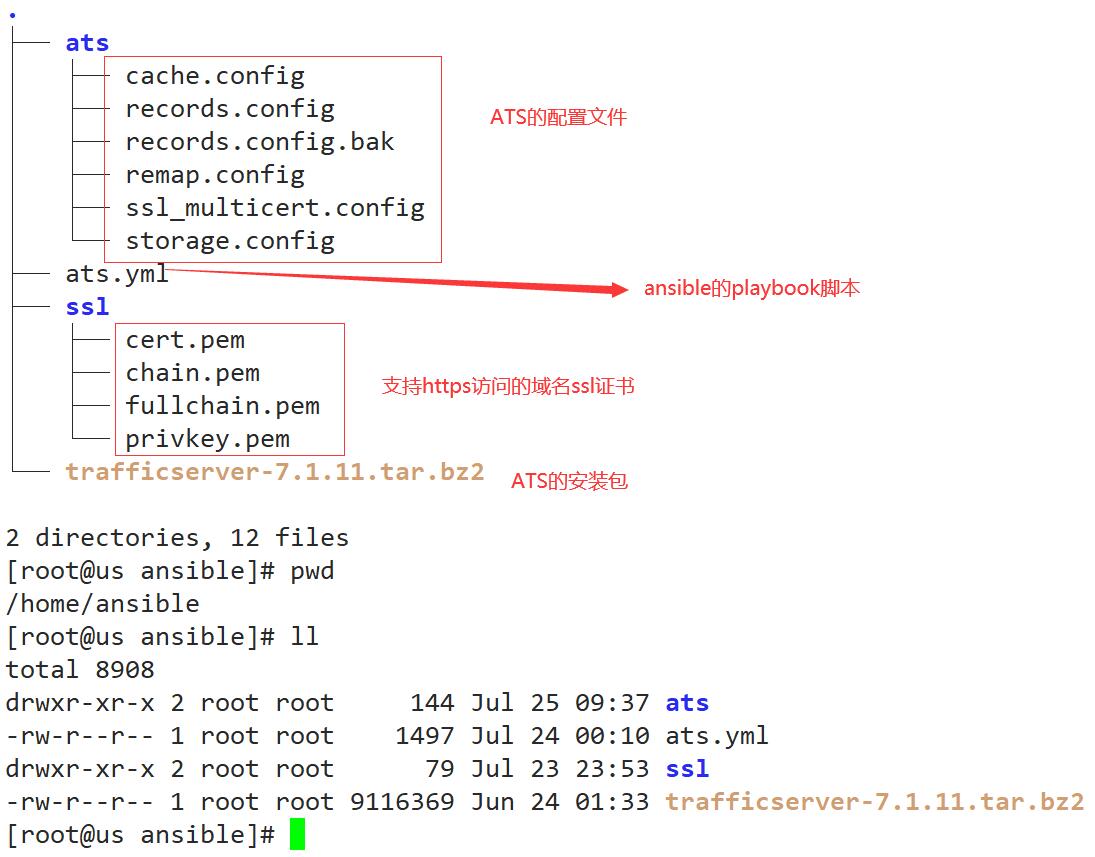
3、创建ATS编译安装的playbook脚本
目录结构:

[root@us ansible]# vi ats.yml
---
- hosts: ats
  remote_user: root

  tasks:

#安装依赖包
  - name: install package
    shell: yum install epel-release -y
  - name: install package
    shell: yum install -y pkgconfig libtool gcc make tcl-devel openssl-devel pcre libcap flex hwloc lua zlib curl  ncurses-devel ncurses gcc-c++ bzip2 tcl-devel

#创建安装目录
  - name: "create installation dirs"
    file: path=/usr/local/ats state=directory

#创建存储目录
  - name: "create storage dirs"
    file: path=/var/cache/trafficserver state=directory owner=nobody group=nobody

#解压并拷贝ats文件
  - name: "copy and unpack source tar ball"
    unarchive: src=trafficserver-7.1.11.tar.bz2 dest=/usr/local/src copy=yes

#编译安装ats
  - name: configure
    shell: ./configure --prefix=/usr/local/ats --with-user=nobody --with-group=nobody --enable-experimental-plugins && make && make install
    args:
     chdir: /usr/local/src/trafficserver-7.1.11

 #创建软连接
  - name: create links
    shell: ln -s /usr/local/ats/etc/trafficserver /etc/trafficserver

#创建ssl证书存放目录和
  - name: "create ssl dirs"
    file: path=/etc/trafficserver/ssl state=directory

#拷贝证书和ats配置文件到指定目录
  - name: copy ats confs
    copy: src=/home/ansible/ats/ dest=/etc/trafficserver/
  - name: copy ssl keys
    copy: src=/home/ansible/ssl/ dest=/etc/trafficserver/ssl/

#启动ats服务
  - name: start trafficserver
    shell: /usr/local/ats/bin/trafficserver restart
4、测试ats.yml脚本的执行情况(干跑并不执行), ansible-playbook -C ats.yml
5、执行ansible的playbook脚本 ansible-playbook ats.yml
6、批量清理ATS缓存和重载配置文件:
### ATS重载配置文件
[root@us ats]# ansible ats -m shell -a "/usr/local/ats/bin/traffic_ctl config reload"

### 停服清理ATS缓存
[root@us ats]# ansible ats -m shell -a "/usr/local/ats/bin/trafficserver stop
[root@us ats]# ansible ats -m shell -a "/usr/local/ats/bin/traffic_server -Cclear"
[root@us ats]# ansible ats -m shell -a "/usr/local/ats/bin/trafficserver start"

### 由于生产环境是不允许停止服务清理缓存的,所以推荐下面的不停服务清理ATS缓存
[root@us ats]# ansible ats -m shell -a "curl -vX PURGE -H 'Host:www.kaifashuo.com' http://127.0.0.1:80"


还没有任何评论,你来说两句吧